Thursday, July 29, 2010

Alpaca locks needle felt animal

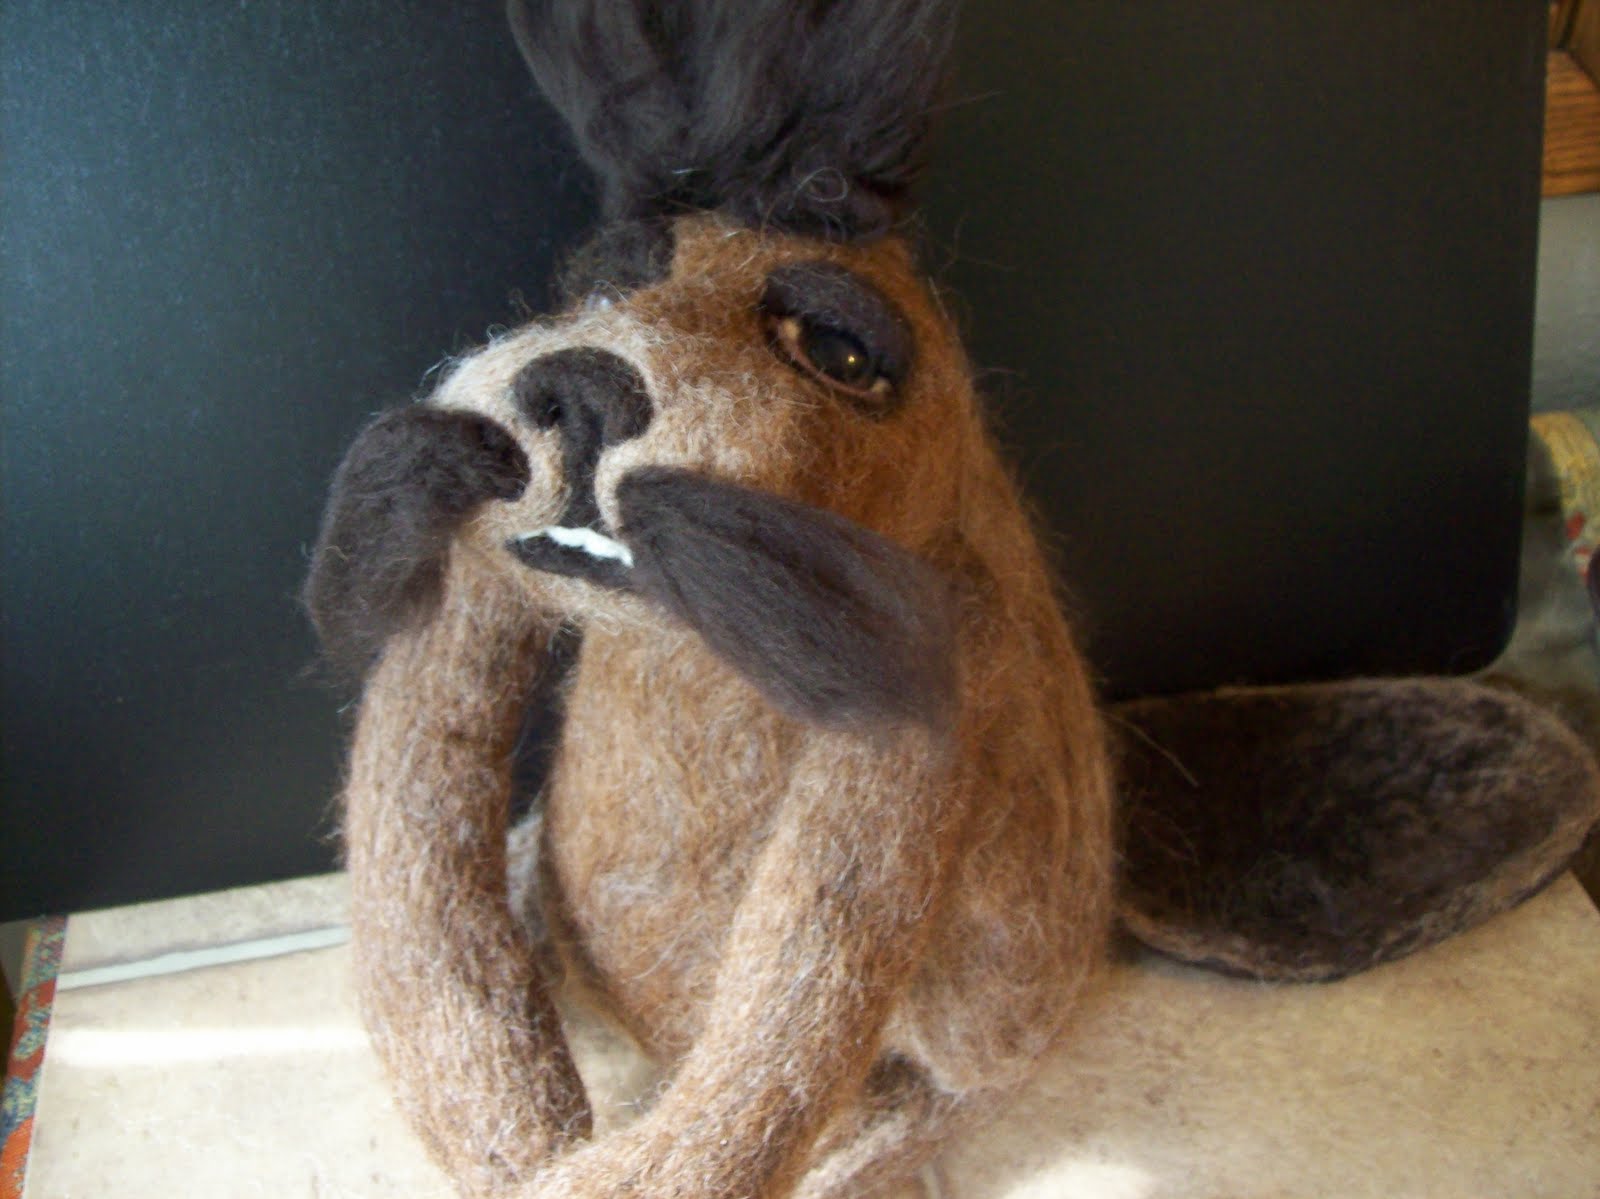
Just a quick post as I am currently in the midst of a needle felt project that I would like to get done Friday .

This is my first full body covering of alpaca curls from North Star Alpaca on Etsy . I spent about 16 hours making the base sculpture and adding all the details . I wanted to get it done before I added the curls so that I wouldn't mess them up after . I would love to do a tutorial of this when I feel a bit more confident in my procedure but still feel I am in the experimental phase . I do love the end result and my Bf and I spent a lot of time petting the critter last night because the fiber is unbelievably soft . Most of the fibers appear to be holding but there are a few root end sections that could use a bit more felting down to make them more secure . Although petting is fine you certainly wouldn't want to try and brush the hair or pick him up by it....(who would do such a thing ?)
I think his profile actually looks cuter then face on .
DO you think he looks like Cousin It from the Adams family.....hummm, perhaps that will be a project in the near future or tribels from Star Trek.....(eh gads, my nerd is showing) .

Happy felting !

Wednesday, July 28, 2010

Alpaca needle felt and wet felt and nuno silk gauze and merino

This has been a week of experimenting with "firsts" for me . Above is the nuno scarf with white silk gauze which felted much better then the chiffon because it ha larger "pores" for the fiber to migrate through . (It's the one wraped around the felted animal .

The animal is sitting on top of two merino and alpaca wet felted fabrics .
This "whatever he is"....is made with merino and mixed core fibers and topped with several different natural colors of alpaca .
I almost gave up on felting alpaca because it takes so much longer to felt but it works great as surface fiber if you add a nice thick layer over your base fiber .
I like the "natural" look of both the colors and fuzzy texture .
The orange fabric was an interesting project . I layered alpaca "seconds"....the less desirable fiber between top and bottom fibers of merino and mystery fiber and ended up with a fiber sandwiched that was several inches thick . This did take a while to start felting and used a lot of water to soak all the way through but I love the sponge texture created by the alpaca in the middle . The fiber snack on both items was a new very thin roving I bought from ......WIldthyme on Etsy . The fiber balls seem like the perfect thing for spinning but are also so nice and thin that they make the perfect accents for the top of wet felting .
http://www.etsy.com/listing/52092455/iceland-poppies-roving-bulb-merino

The blue fuzzy fiber material is created with a base of silk and merino in black (on reverse side) covered with a thin layer of dyed alpaca seconds from North Star Alpaca on Etsy ....This might be a little itchy for a scarf but will make a great bag fabric or table runner .

Below is my first experiment with merino and silk gauze . The hand dyed merino fiber is also from WildThyme candy balls and stayed bright and soft . The end result has a really soft hand and drape for a scarf .

As always.....click on the picture for a close up of texture and slick on Etsy shop names to be taken to buy the fiber shown .

Happy felting !

Monday, July 19, 2010

needle felt animals, fuzzy forest friends

Remember the pre-furry otter who looked nothing like an otter ? This is him....after I tried several layers of different colored wool (lacking patience to wait for my fur colored roving), my brown roving finally arrived . His face is hand dyed merino from Chamelion Colorworks which she calls Earth. His body is fernwood blended merino from Ashland Bay sold by Eweniquely Ewe Fiber on Etsy and baby alpaca locks from North Star Alpaca . The mass of locks are not easy to work with but well worth the effort in my opinion .
I think the end result was worth the several days of constant poking and the long ears give him a bunny look but his tail is long and thick and acts as a tri-pod to help him stand . He's a big boy and must way at least a pound .
I can't even begin to guess what this guy is and both creatures are more stylized then realistic . At least, I have never seen them wandering around my neighborhood .

I hate to wait to get more of this color but Chamelion is on vacation until the end of the month and I'm broke anyway, so.....looks like I will have to wait .
Below is the lovely selection of Ashland Bay merino and silk blends that I bought from Eweniquely Ewe and hope to use to make some wet felting and nuno felting . I still need to get organized to dye the many yards of silk fabric I bought a month ago . (I keep forgetting to buy vinegar to use with the dye .) Hopefully I will remember to bring my camera when I begin the dying so I can have a tutorial .

Happy felting ( and don't forget you can click on the pictures for more detail and click the fiber sellers names to get some of this yummy fiber .... I love click technology !)

Wednesday, July 14, 2010

Braided bangle bracelet needle felt tutorial

Above is the end result of this tutorial .
I had originally hoped to offer more tutorials in this blog but was constantly forgetting to bring my camera to work to take pics of each step . I also have to apologize for the poor color quality of pictures as they were taken at night with only a regular light bulb . If you would like to see more realistic colors of this gorgious merino please check out Yarnahoy on Etsy . I purchased the 2 pounds of 5 different colors and they are all her own beautifully blended merino . Shipping and prices are reasonable and delivery was fast considering it is coming from over seas and arrives here several days before another US order !
http://www.etsy.com/listing/50857337/20-percent-discount-for-2-lbs-of-pure


To begin....I used two contrasting colors of roving and measured the length at about 10-12 inches counting on about 50% shrinkage . Although you could just needle felt a straight rope and add closures , I really like the convenience of a slip on bracelet . I use rather thickly carded roving for this but you can create a thinner bangle by splitting roving in half and making two similar covered "stacking" bangles . As with more needle felting.....the thinner the piece , the more likely you are to poke yourself, so I would save this for when you feel more comfortable with the needle .

-tack the two roving strips to felting mat or use some sort of clamp to hold it in place as you braid .
-divide your chosen primary color into two sections and place on each side of middle color(accent color) and braid sections together .
-the tighter the braid, the faster this project will felt as it forces the sir pockets out .
-Begin at one end and very lightly poke the fiber from all side lifting it off the mat as you go .
-be sure to poke at all angles so that you get an even end result . One trick is to think of the needle as pushing the fibers in the direction you want them to go . Although you often see people recommending that you keep your needle at a 90 degree angle to the mat so you don't break it , this rule is only true when you are poking fiber into something very hard . The reality is that you should move your needle in all directions and angels and putting needle almost parallel to the fiber surface will result in a much smoother result and keep you from ruining your fiber mat to quickly .


Although it is natural to have fiber migrate to the back of the surface you are felting, if you want crisper colors you want to keep this to a minimum . The above illustrates what happens if you poke to hard and at a 90 degree angle . Not only do you end up with muddier colors but can result in pieces of your felting mat attaching to your fiber . Should this happen, you can pull foam pieces off fibers or even trim the fibers off before you continue felting .

-trick one is to very lightly tap the fiber with only the tip of the needle.....light hand is important when beginning to felt item
-trick to is keep needle parallel to the surface
-trick three is keeping the item slightly elevated off the mat surface and poking fibers into the item and not through it .
The first step of this project takes about an hour and will result in a fully felted outer "skin" but soft core . Your not done . You could wet felt at this stage but will end up with much duller colors and not as soft a surface . Faster but not as soft result for something that will be on a very sensitive skin area....inner wrist .
Take your semi-felted "rope" and measure where to attach ends to each other by placing it around your flat open hand and hold onto fiber ends at the estimated size . This is hard to explain and may just take some experimenting to find a size that works for you . If you find that you have made the rope to small you can take additional fiber and wrap it around the end piece to connect them . This can add a decorative center piece if you want to add another color at this point .

-tack end fibers together and into each end. This is your weakest link so don't scrimp on the fiber here and add more if it feels to thin . This is one area where you will have to use some 90 degree poking .

-once you have the right thickness , you should also poke fibers into both ends of the circle .

-once you have a complete circle it will require about another hour of felting from all sides to make the core solid and clean up any remaining stray fibers . The end result will be a very solid bangle with vivid colors . Most of the felting at this stage is done by holding bangle between your fingers and felting in different directions to get smooth surface .

-trick....squeeze fibers together a little as your are felting to felt a bit faster .

-When are you done? When the item feels like one more poke will result in a a broken needle it's a good time to stop .
Above I used two contrasting colors and below two blending colors which results in a more subtle pattern .
There are several more things you you can do at this point to get interesting accents .
-add beads
-wrap small sections with copper or silver wire
-sew on small fabric sections to add more texture or color
-wrap small sections with wool yarn or silk fiber and felt into bangle

Lastly, given that you are felting much of this between your finger, there is more likely hood of poking yourself . It would be a good project to wrap fingertips with electrical tape .
Have fun and this does get easier the more practice you get .

Tuesday, July 13, 2010

Beaver with dental work and mustache

A bit of dental work has turned this reformed beaver....who prefers to be called "wood technician" into quit the model of modern lumber jackery .....of course he still needs me to make him an Ax and red plaid jacket . I think the mustache gives adds a lot to his naturally rugged good looks. He has a core of Border Leicester which felts really quickly but ends up being rough like Romney . That is covered by several layers of alpaca which gives him the very fuzzy halo and facial features are done with a nice soft merino . I think he is about a pound of fiber and has a nice heft to him .
Below is one of my greatest problems in taking pictures of my felting......my cat assumes that every time I get out the camera, I must want a picture of him . Strike a pose Ballyhoo Balou .

Monday, July 12, 2010

Wooly hamster and furless otter

This is my first hamster using North Star Alpaca fiber . I think he turned out to look a bit like a "thug" but still cute to me . His base is merino and then I laid on several layers of the alpaca leaving some baby alpaca locks just rooted in on the back .
I couldn't find my animal eyes....happens all to frequently as they get sucked into the craft supply vortex to often.....so I had to resort to felted eyes but these turned out better then many of my past lopsided eyes, so it was good practice . Below is the beginning of my attempt at an otter . I used some rougher core wool to create a simple shape then covered him with some of the alpaca "seconds" which turned out to look rather flat and was more difficult to work with then roving . I think I will have to resort to hand carding this into roving .

Inspite of the generally soft alpaca. this does have a bit of VM and guard hairs and is generally hard to needle felt with out carding . I do love the baby alpaca locks but it has a bit of barn smell that I don;t think some will appreciate.....though I personally love the smell . So instead of covering with the baby alpaca I plan on using merino . Problem now is that I have no good brown colored merino because my favorite "animal color dyer" is on vacation . So....I am considering covering this "almost otter with some brightly colored merino ....maybe orange ? or perhaps I should practice a bit of patience and wait to "fur" him until I can find some nice brown ?
Posted by Picasa

Thursday, July 8, 2010

First fiber has arrived from North Star Alpaca and it's yummy .

Wow, what a lovely bunch of alpaca .This is from North Star Alpaca of Etsy. I got a great deal on some "seconds" that will work perfectly for needle felting and some bright and beautiful dyed alpaca that I may use for adding texture to my wet felting or make some colorful fantasy animals . The blue and orange shade look really nice together...to my eyes anyway, I love contrast . She also added some wonderful bumps of different "animal" colors for my critters as well as a card with one of her beautiful alpaca and a great smelling sachet of lavender .

Below are just some more merino bangles and two cat collars which I will do a tutorial on when I get some of my new merino this week . A fun and simple project for new felters .

Happy felting .

I leave you with this inspiring video of my new favorite animal......


Wednesday, July 7, 2010

Needle felt outdoors photoshoot.....fail

This week off I did very little felting but spent hours trying to find new fiber as my stash is getting frightening low . I will try and show it as it dribbles in this next week . The above larger ????whatever he is, is another experiment in merino covered in thinner layer of alpaca .
I also finally made myself get outside to experiment with out door pictures . Photoing is one of my larger obstacles to listing items on Etsy . I spent several hours looking at other Etsy felters pictures and trying to see what they were doing that made their pictures good/bad . Felt is difficult to take pictures of as the vivid colors and textures seem to go flat . The majority of my pictures have been indoors with natural light.....(but in an apartment that gets very little light .
I had hoped that taking pictures late in the day....5pm, would be dark enough not to wash out the colors but add the depth missing in indoor pics. I found that full light was still to much as shown above .
The above and below pics are done in the shade of a tree using a flash and not using a flash . It's taken from a distance of about 6 feet because I wanted to get a panoramic including all the animals .I'm hoping to eventually use a shot like this as a header for my blog and Etsy store .


Other then finding out that direct sun light makes horrid photos, I don't see much advantage to shooting the pics outside . Perhaps it is a matter of needing to adjust my camera but I think more experimenting is needed to learn to capture the color and texture .

Saturday, July 3, 2010

Needle felting animal friends

above "critter' was voted the favorite of my new animals by the 3 members of my household....(my cats refused to vote on the grounds that "they" are obviously cutest) . I'm not sure exactly what that allusive "something" is that makes certain felt animals appeal to me and certainly don't know what appeals to others but I think it would be interesting to have a "favorite off" and give away when(if???), I get my new Etsy store opened .(Posing on the dogs head is an unfinished miniature that is waiting for his eyes . )


Above is about the cutest real animal that I have ever seen . I am still working up the nerve to try again to make a sea otter but the babies just seem like a pile of floppy fluff....harder to sculpt then you might imagine .

Below is also from my favorite site of cuteness....Baby Zoo animals....This is my new source for animal pictures which my sculptures do not resemble but are certainly inspired by .

Play Time for Polar Bear Baby

The one I found most difficult was the polar bear, (click the above link if you want to see what a real polar bear looks like)..... which took several reworkings and still doesn't look like a polar bear in about 10 different ways . Perhaps I will try another polar bear now that I have some pictures to look at instead of just trying to "remember" .
I had fun mixing merino and alpaca in my latest animals and think that blending works better then either on their own . Hard to see in these pictures but the natural colored alpaca does add some interesting contrast to the flatter effect of the dyed merino .

The Polar bear is pure white merino and it seems that the white shows the poke holes more and the sculptural detail less . I also found out that even putting the animal eyes in at a few millimeter at the wrong angle can be a huge deal and not to easy to fix . Lessons learned .
Posted by Picasa

LinkWithin

Related Posts with Thumbnails