The above is my personal favorite for the week . I made it as thin as I could...(cobweb style?) and used lots of silk caps and a bit of milk protein<------(OK, what happened to the spelling rule ..."i" before "e" except after C or as sounding like Hay as in Neighbor and Weigh ? ).......to add texture and strength . Problem is that I didn't thin out my milk protein enough to let the wool fibers felt into it and had to go back and needle felt it in place . It still shows poke holes where I needle felted but I quick wet felt will heal those over .
Above and below are the experiment using resists to create flaps . After re-examining, I do think this is OK for a scarf as the non flap areas are thin enough to create drape . I will definitely use thinner prefelt in the future though as the flaps are thicker then necessary which doesn't allow them to get that cool ruffled effect .
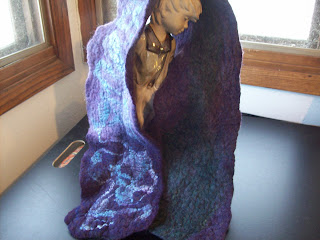
Above and below are another attempt at making cobweb using thin layers of merino and lots of silk fibers . It's super soft and I like the colors but, again, I worry about how well something like this holds up over time . Does anyone have any experience wearing cobweb scarfs? I originally made this for my mother but it turned out a bit wild for her tastes . Perhaps my mother in law or one of sister in laws would like it ?
Ok. the above and below "scarves" are what I would consider as scarf "fails" ,though not wasted as I can use them for other things . On the lattice scarf, I had hoped to use it as a bit of texture sewn over a silk velvet base....I still plan on doing that with a merino lattice scarf but the wool I used here is just to rough , even over a velvet base , if it touched my neck it would make me scream .
The scarves above and below were my attempts to make "manly" neck wear . I didn't want them to be as delicate as the cobweb but these turned out to thick to make a comfortable scarf . (My bf cringed when he tried one on . )so...these are bound for the table runner or purse pile fabric to sew. The bottom scarf was an attempt to add some baby alpaca curls but I could not get those curly little buggers to felt with out burying them in another layer of wool . Bummer, they sure looked cute and soft laying on top of the wool . I think I will have to stick to needle felting them to the edges of felt .


I wanted to make a few more easy and inexpensive items to my shop and using a cookie cutter does speed up the sculpting but don't be fooled by how easy it looks . Even after you have a "basic" sheep shape, you have to take it out of the mold and do a lot more poking to get it firm, pluss adding the wooly top coat,ear, hoof and tail details . Each sheep took me about 2 hours but was nicely mindless work while watching TV . You do need to be careful not to break your needle by poking into the metal mold .

Below are a few more needle felt jewelry projects from the week . The top two circles were my first wet felt ropes....I actually hate making wet felt ropes (makes my palms itch), but they are part of felting so I'm trying to get over it (and wearing cleaning gloves helps alot). The also do make great headbands . I attached the two ends with some fiber and silk and felted a bit more silk fibers into several sections . (I put them around my neck like a necklace (which you could wear them as), and then pull them up over the front of my head . They have some natural stretch so make them a bit shorter then the circumference of your head so they will stay in place . Obviously, you can decorate them with any kind of flowers, beads, ect . On the bottom of the picture is a bracelet using the same principle except I just doubled it up and felted into crossed area and end sections . The middle piece here is part of a necklace . I plan on adding some ribbon or leather (haven't decided), to both sides that can just be tied in back . It started as a tightly braided handspun yarn, then was needle felted together and more roving needle felted into it to create the pattern . It's a bit "busy" for most folks but the kind of thing I like myself .

Below is one of my projects for the new year....(leave it to me to start making winter items in January .) I plan on making some hats and scarves as well as using it for some part sewn/part needle felted animals . It really feels yummy but I imagine it's going to be a pain to hand sew .
.......and lastly, one of the many projects/goals for the new year, reorganizing my craft room and getting tags on my felt items for sale . I now have enough felted items to open my own brick and mortar, (but have zero desire to do that so I better start figuring out how to sell them .)
Happy felting and happy holidays !


W reszcie pokazałaś efekty. Super ten szal turkusowy i niebieskim. Dzięki za kurs obrazkowy, wreszcie wiem jak się robi takie falbanki. Wiele wyjaśniają.
ReplyDeleteLovely colors!! The manly scarf has such wonderful colors..too bad it ended up being too thick. I'm sure you will figure something to make out of it. Your needle felted sheep are adorable!!! Good luck on organizing your craft room...that's never as fun as making the mess to begin with! :) Have a wonderful holiday!
ReplyDeleteYou've really been busy!! I think with cobweb scarves, as long as you don't catch it in something
ReplyDelete(easy to do if there are actual open areas in the felt), it should last as long as any felt scarf. Gentle handwashing from time to time when needed should be all it takes to keep it in tip top condition (oh, and keep the moths away) XXO-
Thanks for the comments . Good not to feel alone in the blogisphere .
ReplyDeleteOMG ! You are me ! I read your blog and had a little freak because it was me ! Would love to share ideas and tips with you !!
ReplyDeleteHi "fiber fun" . I love to share tips and ideas with other fiber folk...I tried to contact you through your blog but can't seem to find one ?
ReplyDelete