I did ask him to politely to leave but was greeted by the usual cat look of disdain .
" Surely you jest madam "
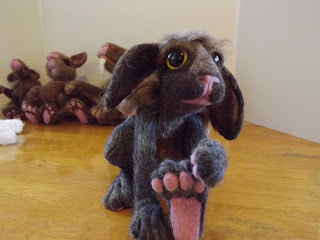
This group of felted animal I worked on texture and posing . Above critter is raised slightly on his right back paw and has mostly a smooth coat of alpaca and silk with the pink merino toes .
The above critter in the next few pics is a combination of all my textures....very smooth merino on the "skin" bits of lips and toes . The paws are tightly compacted but with a hairier alpaca/silk blend but I used a new technique with the upper limbs, body and face . It involves using a reverse barb felting needle . I first learned about these from one of my favorite bear makers . She provided a link to a needle felter who is selling some of these reverse barb needles that will soon be discontinued and you can find her through this link....http://desertmountainbear.blogspot.com/search?q=reverse+barb+needles
If you have a few hours, please check out her other posts as she is the most generous crafter and shares her process step by step and her bears are amazing .

Another technique I have been using for the past few years involves making a sort of "wig" over my hard felted animal . There are several different ways to do this but my personal favorite involves lining the hairs up so they are all about the same length (hard to explain but not hard to do with roving) . I then lay down the section over the area I am covering and poke in the middle of the fibers . You don't want these to come out so you need to do a lot of poking . When it is fairly secure I lay a cross section of fibers horizontally and poke them over the fiber section to further secure them . Think of it as using the horizontal fibers as your "thread" and the felting needle as your sewing machine needle that is pushing the thread over the material to attach to the animal . (I have no idea if that makes any sense but if you want further explanation, just leave a comment and I will try and explain it better ) .
You can then fold the top of this section down and create a full shaggy look . It takes a bit of practice but I really like the durability and look of the end result .
I will warn you, the reverse felting needles take a lot of use to get the fuzzy effect but you can create a sort of velvet texture with lots of persistence or less hair pulled out creates a more sparse look similar to the vintage "worn mohair" bears .
Not really related to texture but I have also been playing around with animal posture that speaks to be personally . I like having one leg out straight so you get the best view of the little pink toes and one leg bent at different angles , partially bent back, which gives a slightly more animated look then having both limbs symmetrical . I'm trying to do the same things with the arms and head position .
Above just shows one very simple "furring" technique to just add accents . You lay matching fiber towards the end of the area you want long hair and felt in the top portion . Just remember that the fibers "shrink" as they are pushed into the sculpture so make sure you have the portion you want loose at the ends long enough . I leave my edges uneven to look more natural but you can get a different look by trimming the ends evenly . You can also create several layers this way by starting at the end and doing several layers back towards the back of the limb or body .
So , although I realize that many of you are wet felters, I hope that some of these techniques can be helpful to add some "fuzzy" textures to your wet felt work .
Happy felting !


Aż cud, że filcaki całe. Mój Gizmuś sam przefilocował sikorkę. Świetny zwierzyniec filcowy a kot to istny arystokrata.
ReplyDeleteWow look at all those gorgeous creatures, they really do look amazing and it looks like your having so much fun :)
ReplyDeleteWow these needle felted critters are lovely ! (as is your white fuzzy companion ...)
ReplyDeleteThanks for your visit to the Feltalong galery. Are you participating too ?
Thanks for visiting ....
ReplyDeleteEls, I lost my old wet felting table so have only been needle felting lately . I hope to remedy the situation soon but not sure when . I miss the wet felting colors....love making animals but the brown does get a bit redundant .
It's been so long since I got to look at your blog! Fantastic! You have some awesome, interesting techniques. Thank You for sharing & I'll be spending some time poking around here! So great to see your progress!!!
ReplyDeleteThanks Chrissy, It's a slow process for me, but I think every year I'm learning new things and making some improvements which keeps me from getting bored .
ReplyDelete