These dragons are definitely out of my comfort zone . I had no idea how to make the wings and spent a day just looking at google pictures of different kinds of wings . It seems that most dragons are given ether bat like wings or pterodactyl wings .
For the smaller dragon , (which I started with needle felt wings), I decided to try leather bat like wings . I thought the larger dragons narrow wet felt body and needle felted scaled tummy looked very insectoid so I thought I would do more of a dragonfly wing .
Above and below are the small dragon wings using some of the scrap leather I collect . I didn't do a rather sloppy job of cutting the leather strips that are covering the top edge and two projecting "spines" because I planned on covering that side with some fabric which ended up being a mistake as the fabric I chose was to thin . I kept the wire in place using some very strong double sided tape I picked up at Axman<---love that place for craft supplies . I left a bit of wire projecting out the edge of the wing and wrapped it with another AXman purchase called...."thread tape" . It's very thin, not sticky and bright white so I thought it would make a good claw . (If you've never heard of it, it's the stuff you wrap around pipe threads when you connect them to prevent leaks . )
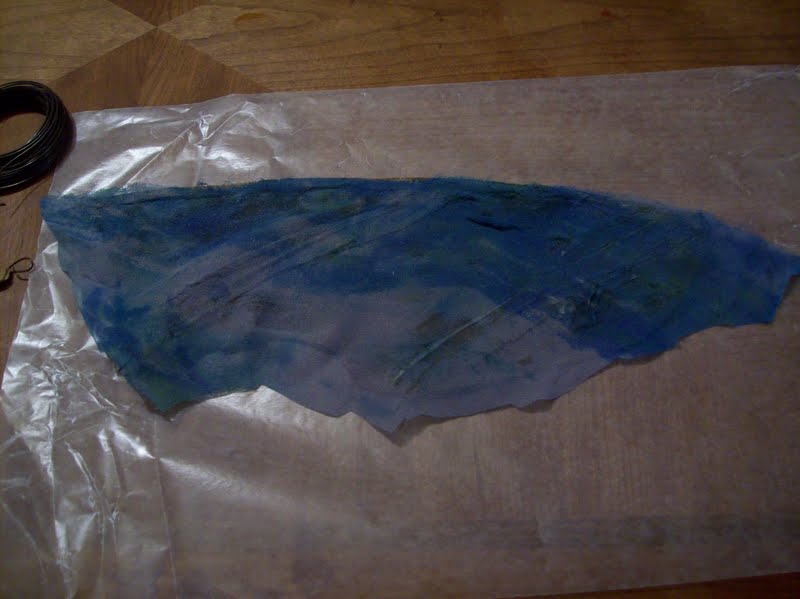
The above (before trimming ), is the dyed chiffon that I adhered with and coated with "glimmer modge podge" to the wired side of the wing .
Above and below are the dragon fly wings . I began by cutting out a form to wrap the wire around so I could make sure and have the same basic shape and size....that is something that I don't do well just by "eying" it . On a side note....the material I used to make my form also works great for needle felting and you can get a huge piece for around $15 at your local home building store . It works much better then the cheap packing foam and is cheaper and less messy then pillow foam mats . Downside is that it's noisier .
My basic process needs a lot of work and a trip to the craft store . I want something that I can attach to the wire frame that is transparent AND that I can draw/paint the wing veins but it must be durable and shippable . The durable part is really important as is finding the best method to attach the wings to the dragon so they can easily be removed for shipping . Problems like this are what I thrive on so I have some fun to look forward to .
I also decide that I have to overcome my trepidation of using wire in my animals . I'm starting by using wire to make feet but more of that later .
The second dragon is finally finished...maybe . I did experiment with some new wings last night that I might try as I'm not totally satisfied with the needle felt wings .They do "go" with the over all cartoon look and they are super soft merino and silk but they aren't very dragony . The feet are wired so I could curl the toes . I hate needle felting with wires....took 6 hours because I had to work slow enough not to break my needles on the wire .
The body is covered in a layer of alpaca and silk in purple, green and blue but I can't seem to take a picture capturing the shine . Not much to blog when each animal is taking me a week to finish .
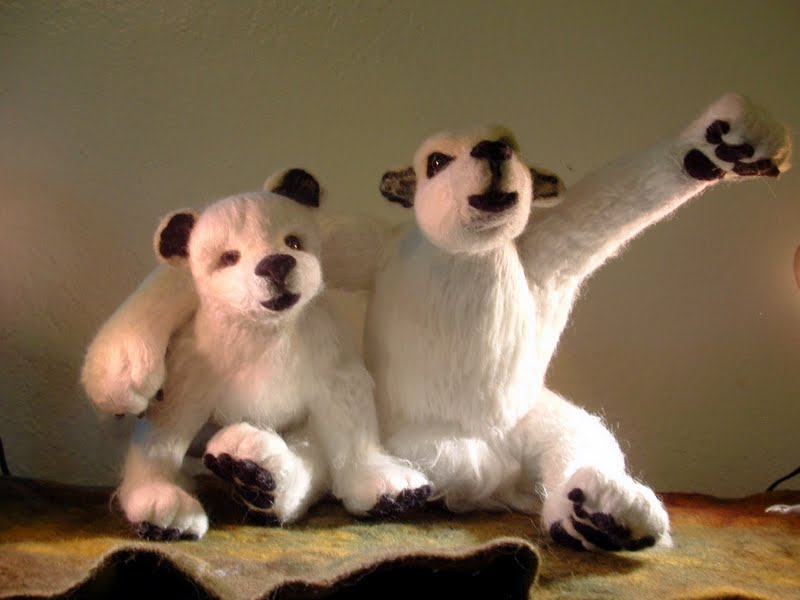
Please click on the pictures for more detail because I spent a lot of time on detail for this mom and teen polar bear set . Most of last week was building the base of wool and needle felting the claws and paws .
The feeling I hoped to create was of the innocent bear cub getting ready to walk off to explore and mom's protective arm holding him back as well as the raised arm issuing a warning to anyone considering messing with her cub .
I'm not a natural sculptor so getting proportions and body positioning right is hard work for me but I really wanted to try a more cerebral challenge . I'm hoping to get up the courage to enter this into our local state fair but deadline is approaching and I'm not sure if I will over come my trepidation in time....or that this will fit into one of their crafting categories .
Above are a few more detailed shots but even with the photo lights I used, it is hard to see the texture of these bears and I have a little secret to share about that........corn fiber .
Yep, unknown to me, the stuff not only felts well into the wool base but is softer, shinier and less "matting" then the traditional merino I have used in the past . I tried a blend of alpaca and mohair first and didn't like the end result which was to "hairy" , so I gave the Ingeo=corn fiber, a shot and it worked a "treat",( as the Brits say ) . I'm now so enamored that I ordered another 8 Ozs to play with and hope to get it this week . I loved how pure white this fiber was and was pleasantly surprised that it not only felted into the core fiber to make nice hair but you can also use it to felt alone, though it does take longer to felt then wool, I think it worked great for nails, teeth and horns .
Above is my only other finished felted friend from last week . I don't know "what" he is but I think he's cute and less scary then most of my animals .
Following are dragon "bits" from my current week long project ...hopefully I will have to time to finish and post more details about my process before Wednesday when I return to my paying job .
This begins with the dragon head using corn fiber for the teeth and horns . Then I decided I wanted to try and use some of my wet felted material for the body but made it to large for the head so these will be two different dragons .
side note...(One of the reasons that I began learning nuno and wet felting was to make my own "fabric" to sew animals , use for making their clothing and as mats for them to sit on . However, I found the whole wet felting so fun I got a little carried away and it became it's own obsession . Now, I am trying to get back to why I'm wet felting and the dragon was my first in that goal . )
I didn't take pictures of each step but will try and blog about the details of the dragons once they are finished .
This weeks project was detailing, firming up and altering some of my previous animals . I also took some more detailed and up close pictures of my previous animals . I did notice that just changing the angle of the photograph made a difference in the over all effect .
Above is the "Welcome to Canada Beaver" . I had originally wanted to make him a lumber jack....which is why I added the mustache and planned on sewing a red/black check jacket for him . Doubting that will ever happen but perhaps I will make him a "welcome to Canada" sign to hold.
I spent about three hours firming the limbs, adding ears and paw pads . Although the picture doesn't really show much of a difference, he is much sturdier, proportioned.
The above was another subtle make-over doing a bit more shaping of the limbs and I covered the original "pinkish brown" with a bit more natural looking brown . Unfortunately, the flash combined with the green wet felt mat still make this redder then it is in person .
On of my biggest challenges
in learning to needle felt is how to create a fur look but still have the fiber firmly attached . I think using fiber with low lights and high lights...like natural hair...helps with that but it still doesn't have the "fuzzy" look of fake fur animals . On the other side, it does allow for more sculptural muscular look of short haired animals .
I have done a few animals using a technique of needle/rooting in small sections if loose fiber but that has the problem of eventually matting/felting up....especially when using merino but I have had a little better result using alpaca or mohair that tend not to felt as easily .
Firmly felting the fiber to the hard wool sculpture does result in some poke holes but I have learned to use take fiber down with a 38 needle and firm with a 40...time consuming on my large sculptures but leaves a nicer surface .
I spent the most time...most of three nights, re-doing the above . He began as a :pop-eyed dog that I never liked and he had a head to toes make-over .Although he retains the basic dog body, I covered all with new roving and reshaped, reworked the head to get rid of the pop-eyes and added the teeth ,tusks and bits of rooted baby alpaca on the tail and around the face . He still may not be "cute" but at least he's interesting .
The following are just a few better, in door pictures of my photos from the previous week . Although most people suggest shooting with natural light, it seems to wash out the details of my animals . Though not perfect, I like the in door pics better .
I couldn't recall if I had shown this last guy before...but I really like his long arms and am becoming a convert to using mohair . It isn't as soft as the merino but I love the natural variation in color and shine of the fiber .
So that's it for my week . Next week will probably be a few more make overs and perhaps a few more fantasy creatures . Happy felting !
This is how I am feeling today.....angry and fed up with endless days of rain . It's 2pm but looks like night outside . Although I love the sound of rain and am not a fan of bright sun, this weather is getting in the way of my plans of taking pictures of my animals to list on Etsy . It's been a full week of cloudy skies and no rumor of sun until Tuesday....
On the bright side...the world did not end yesterday, as internet rumors were suggesting , although the skies over New Hope looked like it was thinking about it .
The real purpose of this post however, is to show some of my first attempts to needle felt somewhat "realistic" animals that I plan on redoing . Each has some fiber colors I don't like, bad faces or misaligned body parts . If you have ever seen my first needle felting, you can see that I tended to make really wild looking fantasy creatures . At the time, I just wanted to play with all the different colors and textures of the fibers and thought there were already enough "realistic animal" felters and I wanted to try something different .
Although they might share some basic features with real animals....they were just twisted enough to be interesting to my eyes .
The above dog???? was one of my first attempts to actually make something based on a real animal and I did not like the result . It took over 20 hours and looked "pop-eyed" and front legs never stood well...(no wires) . The front legs were to short after felting and this is when I first realized that allowing for shrinkage while felting was a pretty big deal and it takes a lot of practice .
Although I liked this pup better, I was still having problems figuring out how firm to felt my animals . I made the core very solid but then added very loosely tacked on roving on top . I wanted to simulate both the look and feel of real fur but what I found was....loose merino tends to mat up over time and with handling . Also, some of the wool that looked brown in my dark apt. looked pink in sunlight . ...another "do-over" .
As to the last "dog".....eck! I'm not sure when I made him but it was back when I was still "poorly" needle felting eyes and a poor choice of fiber left his snout totally distorted . Another "do-over" .
But here is the really good part . I put all these animals in the closet and waited until I felt ready to try again . Perhaps they will never be my best work but, the past 2 years I have much more experience in what fibers and needles to use and how to pre-shape body parts before I add them to the body . I believe that I can at least make them better so......Don't ever through out your first projects, stash them until you are ready to see them with more experience and fresh eyes .
I just found another blogger who shares this basic philosophy and who is willing to share some of her own lessons learned . SO, if your interested in learning....(I know I am not very good at explaining what I do when I am needle felting as It is more tactile then cerebral)..... please check out her blog ....I will also have her listed in my "lessons" section top right of blog .
Perhaps she can give me some tips to make this dog a bit less.....hidious and how to make my animals not look like they are going to commit homicide or suicide < Wish me luck and happy felting .
After days of rain and clouds, I finally got to take a picture of my first 4 animals since Shepherds Harvest . Several people commented that my animals looked a bit "Peeved" if not down right hostile . So this week I tried to focus on making them look a bit less like serial killers .
The little guy furthest right looks a bit "agitated" but second from the left appears to be smirking to himself after playing a nasty practical joke...(.evidently on the bunny who looks like she might start crying any second) . I think the first guy on the left looks like the epitome of self-righteous indignation but perhaps I am projecting a bit much ? "They" say that people with Aspergers can not see non-verbal communication but I know what I see when I look at my animals faces, I just don't know how to make them look happy....Effexor perhaps ?
It looks like I can continue to try to make animals that look like friendly Walt Disney critters or learn to market these as......." Animals with attitude from Emo to psychopath "
Firstly, I just want to thank all the visitors to my booth this year . You folks were amazing and I appreciate every encouraging word . Since this is the only feedback I get about the things I make, it is really nice for me to hear that some people actually enjoy my sculpted critters ...(.even though some of them do look like a disgruntled postal worker that you worry might pull out an automatic weapon if you look at the the wrong way .....I'm working on trying to make animals that don't look like they might bite.) .
Anyway, I just wanted to dedicate this to the animals that share the fiber I use to make my animals.......sheep, alpaca and goats . Thanks guys !
Above are just a few of the things I will be bringing to sell at Shepherds Harvest this year . After last years show, in spite of meeting many supportive and interesting people.....I decided that driving alone to the show was just to stressful and I was not going to be able to do it again .
Then, a wonderful person who does not mind my aspie "quirks" offered to share a booth with me and I thought....maybe I could do it . Unfortunately, she encountered personal issues that made the show impossible, then possible, then impossible, so until yesterday, I was unsure if I was going or not . Looks like things have been worked out and we will be sharing a booth so...come look for Knot All That in building D.......(and she really IS "all that", knots and all ). You can find the spining wheels she sells on her Etsy shop....knotallthat .
On another note , a glitch on blogger.....(another one), seems that if you batch post pictures from your picasso album, you can't write below each one, so let me explain here about the first photo . I attended a charity craft fair last weekend and meet some really cool handmadeMN team members . Sales weren't great for me, but I really had fun giving away a new toy for kids and cats...(no cats attended but if the kids decide to share, I'm sure there cats at home will be wanting these as well ). I made them by securely felting some re-purposed silk strips inside wool roving and felting a very firm ball with a tail . When you throw them straight up in the air, the silk makes little fluttery movements that "I" think looks cool . Kids under 5 and cats agree . I think other aspies will as well .
If your in MN this Mothersday weekend, come see me and mention this blog for your own free flutter toy or 10% off your total purchases . Here's a link to all the fun you can have at Shepherds Harvest......(it's not just for knitters, lots of cool animals, food , music, people and it's free !)
I think the weather is supposed to be over 40 this year....what a treat . I Hope to see you there .