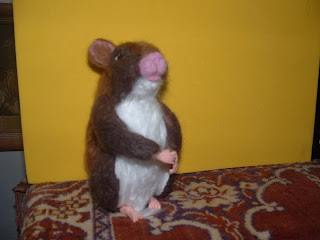
Even as a kid, I was not a big fan of animals in clothes . Hell, I wasn't that big a fan of wearing them myself . Yet, most collectable animals appear to be dressed up with all kinds of accessories . Also, after spending hours creating some definition to the animal shapes, I can't see covering it all up with clothing .
I assume that most collectors want to see animals detailed in some way, so I decided my compromise would be to try and add "natural" embellishments....claws, horns, teeth, and wings .
Above are some of the clay, wire and sculpting tools .
Above here is some of the foil film and double sided tape that I plan on using around the edges of the dragon wings to help clean up the edges and make it more secure . I noticed this week that the edges of the dragon wings were starting to separate from the wire in a few places . I plan on remedying that by covering all edges with the tape and then covering that with the foil paper .
Not a very good picture but these are a few of the claws that I made . bottom are translucent Keto clay and the top are a white with mica Kato . They are a very simple to make even for a novice polymer clay user . Basically just make a crescent moon shaped tube and cut it in half=2 claws . I made some sharp and pointy like cats claws and others are more rounded at the tips . I then stuck wire into the base of the claws and used a cheap foil pan to stick the wire into to dry . Warning....the clay will not stay well attached to the wire and will need to be glued into the clay after it is cured .
I tried several different wire bases to attach them to my animals . I tried heavy gauge copper and craft wires but had the problem of the wire bending when I tried to insert them into the felted wool . Using wire cutters to clip sharp angles into the ends into a very sharp point helped abit but still very fussy to get them into the hard wool . I next tried some vintage hair pins which was a bit stiffer metal but still hard to push in all the way . Solution ?
The obvious solution is to use sewing pins instead of wire . They already have a sharp enough point to stick into the wool and don't bend as easily . So, after curing the claws in oven , I removed the pin and added a drop of super glue to the base of the claw....(there is a nice indentation left from sticking the pin head into the claw base that is a great reservoir for the glue) . Then stick the whole thing into the base of the paw slightly above the paw pad .
Unfortunately , my Bf's son still has my "good" camera, so I am stuck with some pretty bad pictures of this weeks animals but here goes .....
Click on the picture for more detail .
Hard to see here, but I also tried making clay hands and feet for this guy but still not very good at working this small so I will skip a tutorial until I figure out how to do it better .
This is my first attempt at feathered wings . I used some feathers I got years ago from a co-worker who hunted his own turkey for Thanksgiving . I wont get into the ethics of hunting but I saw no reason to let the feathers go to waste so when he gave me turkey body, I plucked and washed the feathers...a first for me....and probably a last. I do love the "hairy" look of the under-feathers that I used here . This was a fairly straightforward process . I needle felted two wing shapes and sewed the feathers on over lapping them to hide the quill bases . I left about an inch of the needle felted base which I covered in a bit more fiber and needle felted into the body . Yeah, very time consuming but I do like the result so will probably do a few more of these .
So, that was my past two weeks , small to large/simple to complex but all good fun .
Happy felting !


Ale pazury. Robi się groźnie!!!
ReplyDelete