Needle felting, nuno and wet felting.(Click on pictures for more detail and feel free to leave comments, suggestions or questions .)
Friday, October 19, 2012
Apoxy Sculpt + Little Miss No Name doll+ needle felting+beading
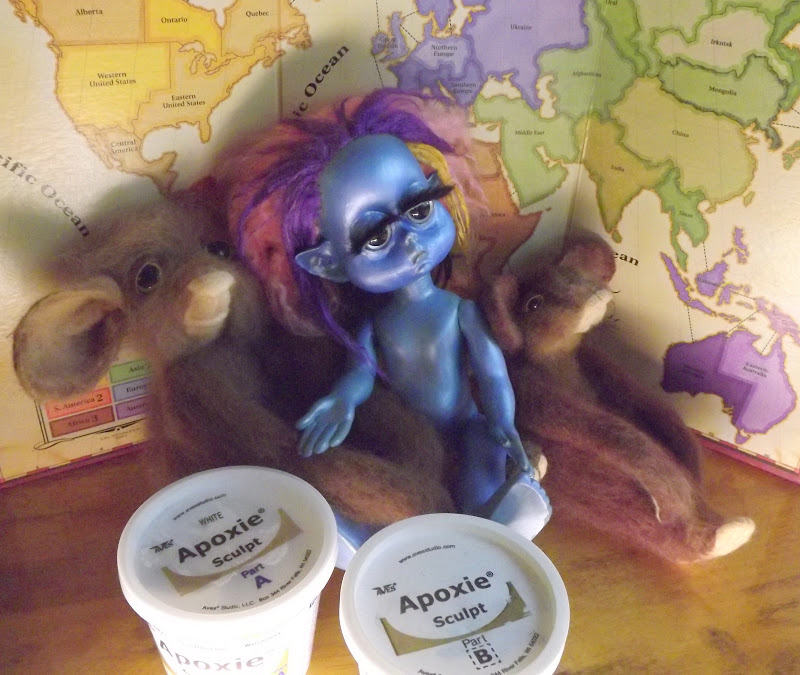
I spent a good 15 hours removing her old hair and rooting in mohair with front highlights of silk to make my no "Little Miss No Name" doll into an alien . I also replaced the eyes and made lids, cheeks and pointed ears out of Apoxy sculpt . I can tell you now that I am going to have a very fun winter with this stuff . It works great on the plastic and latex doll . I made a huge mistake rushing the process and not spending more time blending in the edges . (live and learn_ ) She has some lovely fur lashes and is painted with multiple layers of blued wood glue with a sealer ....all in all, I give myself a C for end result but an A for patience in painting and rooting hair since the whole process took most of the week . I have several other less expensive dolls that I plan on being a bit more creative with horns, textured skin and layers of leather and fur .
The previous week I made her two fuzzy friends
.....and beaded a few needle felt bangles which I made several years ago (talk about WIP),
I also made small steps toward opening my Etsy shop by joining stamps.com so I can weigh and mail out packages . I still am not satisfied with the tags I have for my animals so I have some supplies coming in a few weeks that I hope they will work .
Hope all of you are still exploring and enjoying making things....when it comes to crafting , the more I learn, the more I want to know so it will great to play around a bit more with the new sculpting medium and I have a cheap little rotary tool winging it's way here, so stay tuned
Friday, October 5, 2012
Needle felt animals with fur and leather "Franken ears"
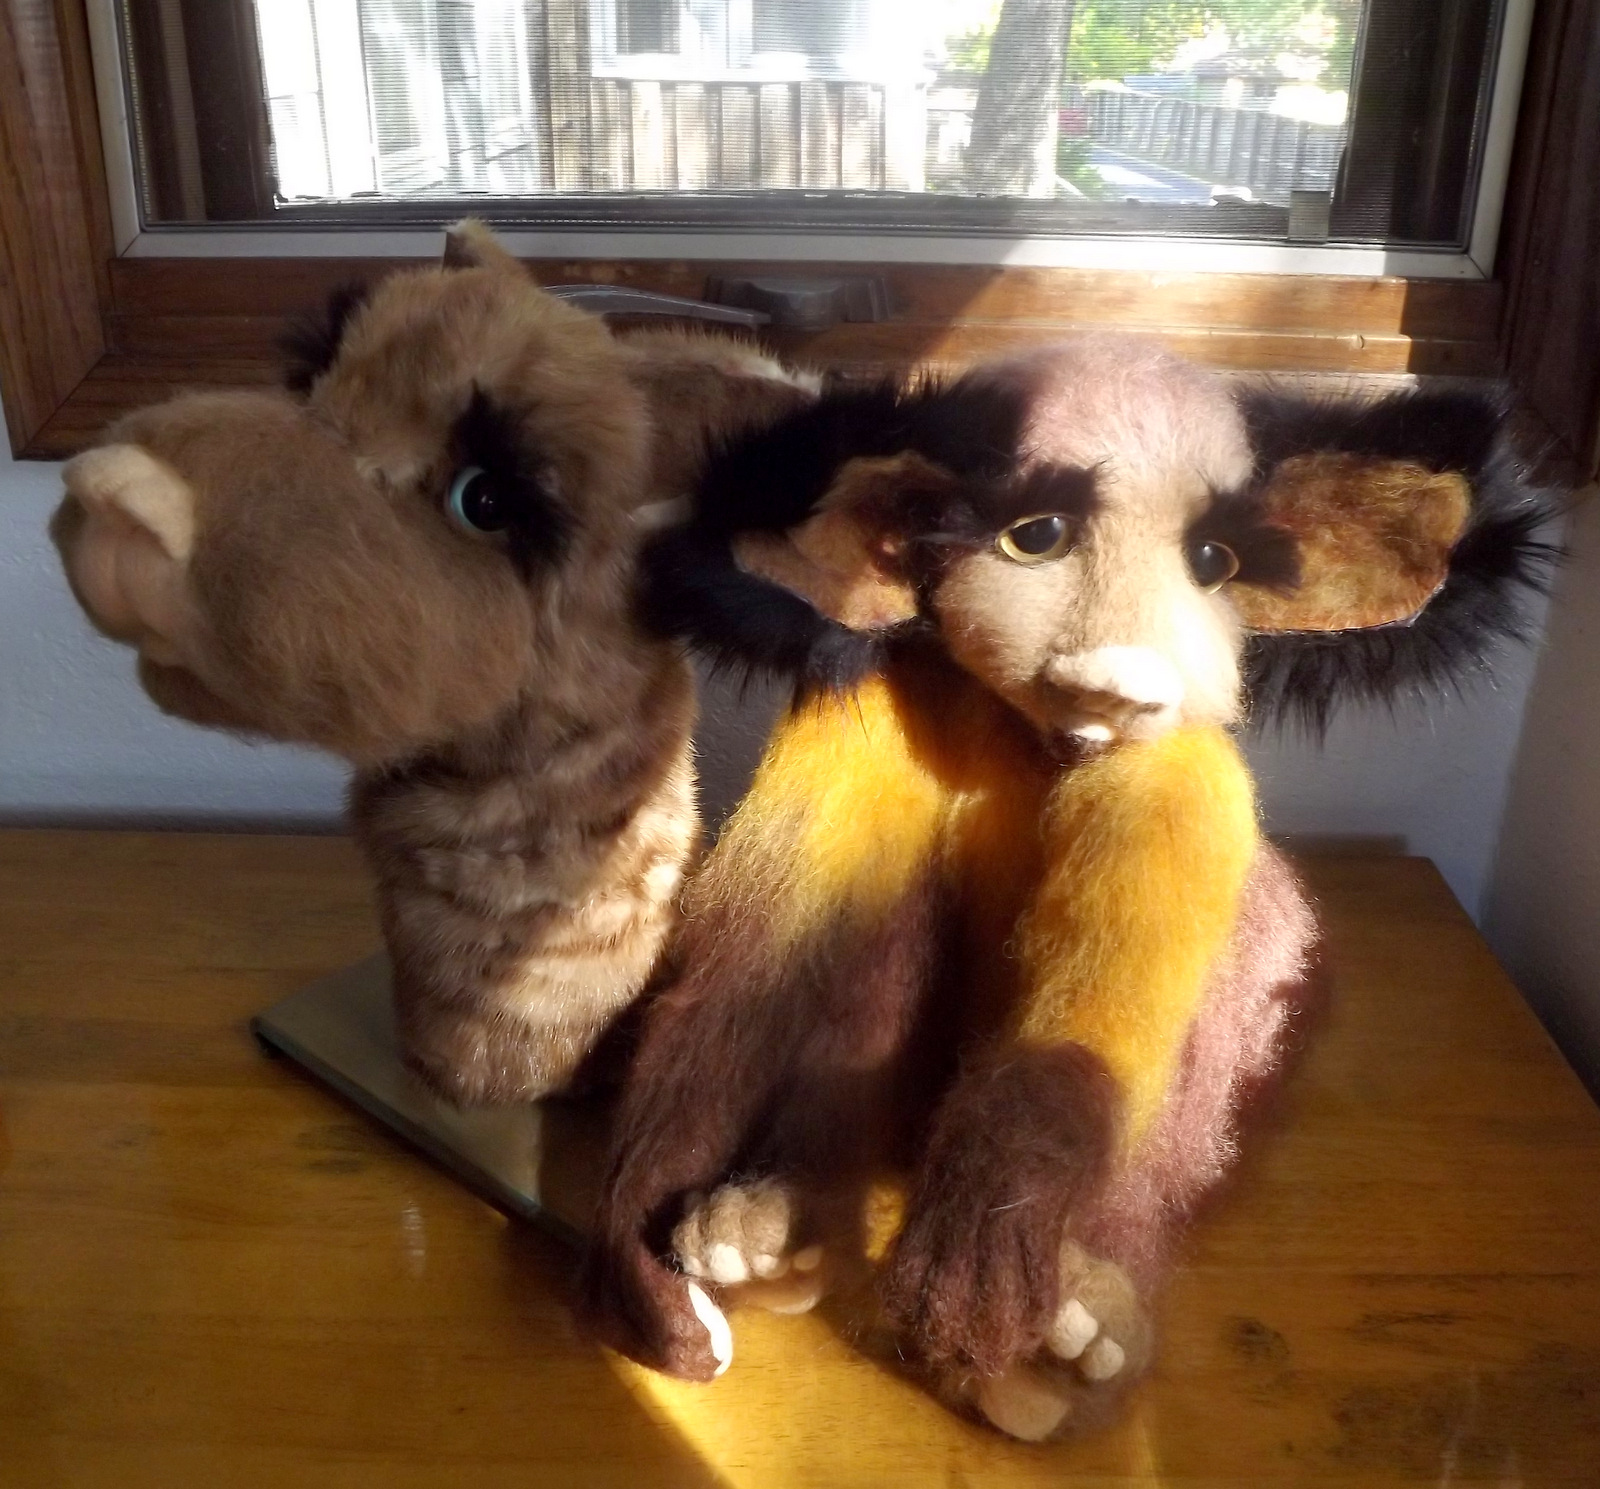
These are my latest two felties . Both have the natural fur/leather ears that I am going to show how I made in a bit . The "table head" , (verses a wall mount head ), has a neck that is covered with the coat sleeve of a mink coat . This was very experimental process as I wanted to just attach the bottom and top of the sleeve to allow for a wrinkly neck like a Shar-Pei dog . It was a bit fiddly but I like the end result . Both critters also have the fur eyelashes that remind me of alpaca lashes .
My goal with the ears was to create something more realistic then my felted ears but it has a major drawback . The wood glue makes the ears very stiff and I can imagine this being a huge pain if you plan on shipping . I suppose that means I wont be able to sell them unless I take them to shows where they wont be thrown about like some mail packages . Or I can just keep them : )
That warning said here is the basic process I used .
Above supplies......
wood glue in Tupperware(with just a drop of dye to make pink ) and gel super glue
stiff angled brush
ruler (for making ear pattern)and marker for drawing ear on leather and skin side of fur
repurposed leather for inner ear
repurposed fur for outer ear
strong stiff wire (craft wire works fine but I used copper)and wire cutter
scissors for cutting leather
exacto type knife for cutting non-fur-side ONLY of fur
Dremal or drill (or in my case a vintage electric eraser that I used dremel bits from thrift store)
..... The above is for making the end of the wire needle sharp so you can stick it in the needle felted critters head ....(ouch)
first is to design the shape you want for your animals ears,
draw onto suede side of leather and cut out with scissors
I used these as patterns to draw on skin side of fur collar here
(However...if you want an even more realistic ear make the bottom of the leather wider then the fur ear and you can then add those cool little wrinkles we all have in side our ears )
Tricky but important part is cutting out the fur part from skin side without cutting fur...I think an exacto knife works best for this but go slow as holding the fur between your fingers to keep it stiff enough to cut is dangerous and tricky but you lose very little fur this way .
cut the wire to the desired length (depending on the size head they are going to be pushed into but at least a few inches in) and use super glue gel to attach wire to skin side of fur . (pressing it down with a craft stick is better then using your finger...(lesson learned the hard way .) The super glue dries fast so don't leave the stick in one place to long just sort of pet the wire with it from top to bottom ) .
Once super glue is dry, paint the skin side of fur with the wood glue(or whatever glue you use) to seal it and wait a few hours until it is mostly dry and add another layer of the glue and match up all the edges of the leather inner ear with the inner fur ear and press down with craft stick(Popsicle stick) . I let this dry another few hours then add a layer of glue to the leather inner ear that is now covering your wires . If you want to add a bit more realism you can add a few strands of alpaca hairs or cut up tiny pieces of it like flocking .
When this last layer is "mostly" dry...barely any wet spots but not to stiff, you can shape it a bit to curve in at bottom and edges . I use a Styrofoam head to stick the wires into to keep the shape as it dries . Last steps not shown are just experimenting with ear placement and once found, adding a few drops of superglue gel to the bottom edge of the ear and pressing (hard) into place .
(Just make sure that your placement is exactly where you want it as it can't be moved once you press down and don't go crazy with the crazy glue as it's more important to make sure you press and hold it deep into the head then use a ton of glue . (You don't want the glue showing at all so sink that ear in firmly so glue goes down into the wool and not around the edge of the ear . )
OK, so I am not a huge fan of these ears . They look interesting but take a long time and most importantly, they don't have the softness of the felted ears . That said, I did promise to show how so there you are, perhaps something in there is usable for someone to play around with but here is the best tip I have to share ....
That is the eyelashes . I tried several different methods for making lashes with many time sucking failures . The only method I found worked for me is using an exacto-knife to cut a very thin sliver off the edge of real fur . This might work with fake fur but the important thing is that you have a natural backing for the hairs to attach to the edge of the lid . Worked a charm and you can trim length of lash as desired . I left mine long because I'm a sucker for long lashes . Actually I think I should make myself a pair to wear as my lashes are almost nonexistent .
Besides making a few critters and lots of experimenting, I also got my craft room a little less cluttered so I can enjoy looking at my own critters ....
You can see the floor now and I can get into the dresser drawers to get my supplies...whoa hoa !
Still a lot of organizing to do but the sewing table is almost usable . I will be adding a TV with netflix to lure me to the sewing table ( I hate sewing) .
So, not all goals completed but making some headway and that's better then a poke in the eye with a sharp stick . Happy felting to you all !
Monday, September 17, 2012
Franken-critters...mixing needle felt and recycled fur "bits"
As if my needle felted trophy heads weren't "creepy/offensive" enough, I hope I don't alienate even more animals lovers with this post . Above and below are my latest experiment in creating new animal friends . The controversial bit is that they have bits of recycled fur coats as accents . Now, I know that "my crowd" <----liberals, are pretty much of the mind that fur belongs on the original beast that grew it and I agree ! My favorite fur is attached to a living, breathing, bouncing, running critters . I would never take theirs or pay someone who did but...the reality is that this still leaves a big bunch of old fur hats, coats that are bound for land fills . I know, dust to dust and all that but putting something that beautiful into a pile of rotting food and old diapers just seems shameful to me . So, for the past 20 years, when I could afford to, I have rescued a few such items from thrift stores and stored them in my closet . I have about 10 of them and no idea what to do with them until .....
I was googeling a good home-made craft glue and happened on a video by a taxidermist . I watched the video on utube where he making the glue and using it to apply the pelt to the animal mold and I thought, wonder if that would work using s wool animal "mold" . Spoiler alert....it does . I tried several different methods from sewing to gluing and found them both very effective . If the skin is thick it works fine to sew it but many of the old coats have thin skin that rips easily when sewn and I think the glue works better . I use a nontoxic book binding glue and the trick seems to be to tack the edges down with pins as close together as possible as well as making sure that you have felted the sculpture very solid . I don't know how much of this I will do but it does seem a good way to recycle the fur .
The above ear was also an experiment to make more realistic ears . I used two layers of recycled leather with wire in between and some glue mixed with tiny bit of red dye . I wont go into details now as I plan on doing a brief demo soon .
Here you can see where the fur meets that needle felted base . If you do have any edges that don't get glued down well it's pretty easy to redo them with a bit more glue and some pins(I think the best pins are the kind with little "pearls" on the ends which you can find in most craft stores .
One of my larger franken critters . Right now I am not doing any fancy patterning, just cutting out a rough shape for the back and head and leaving the face and arms needle felted .
Below is a WIP that I am waiting for time to do an ear demo with pictures . He looks pretty weird with out ears . This one I sewed the back fur on but glued the "mohawk" on top of his head .
He also needs a rework on his eyes . I finally found a good method for eye lashes but not before several failed attempts that ruined his eyes .
Below is Max, my camera bombing cat who assumes every photo-shoot must mean I want him to pose .
I also got my "creepy" trophy heads on the wall so I could free up some table space . I think they turned out pretty good and hanging them gives me an idea of what head/neck position works best for these .
That was it for the past month, little created but many experiments tried and a few new skills to keep tweeking .This is my favorite time of the year to be out-side so I'm not sure how much felting will be getting done. I need to store up a nature fix before the snow falls and in MN that may not be to far off .
Happy felting and experimenting !
I was googeling a good home-made craft glue and happened on a video by a taxidermist . I watched the video on utube where he making the glue and using it to apply the pelt to the animal mold and I thought, wonder if that would work using s wool animal "mold" . Spoiler alert....it does . I tried several different methods from sewing to gluing and found them both very effective . If the skin is thick it works fine to sew it but many of the old coats have thin skin that rips easily when sewn and I think the glue works better . I use a nontoxic book binding glue and the trick seems to be to tack the edges down with pins as close together as possible as well as making sure that you have felted the sculpture very solid . I don't know how much of this I will do but it does seem a good way to recycle the fur .
The above ear was also an experiment to make more realistic ears . I used two layers of recycled leather with wire in between and some glue mixed with tiny bit of red dye . I wont go into details now as I plan on doing a brief demo soon .
Here you can see where the fur meets that needle felted base . If you do have any edges that don't get glued down well it's pretty easy to redo them with a bit more glue and some pins(I think the best pins are the kind with little "pearls" on the ends which you can find in most craft stores .
One of my larger franken critters . Right now I am not doing any fancy patterning, just cutting out a rough shape for the back and head and leaving the face and arms needle felted .
Below is a WIP that I am waiting for time to do an ear demo with pictures . He looks pretty weird with out ears . This one I sewed the back fur on but glued the "mohawk" on top of his head .
He also needs a rework on his eyes . I finally found a good method for eye lashes but not before several failed attempts that ruined his eyes .
Below is Max, my camera bombing cat who assumes every photo-shoot must mean I want him to pose .
I also got my "creepy" trophy heads on the wall so I could free up some table space . I think they turned out pretty good and hanging them gives me an idea of what head/neck position works best for these .
That was it for the past month, little created but many experiments tried and a few new skills to keep tweeking .This is my favorite time of the year to be out-side so I'm not sure how much felting will be getting done. I need to store up a nature fix before the snow falls and in MN that may not be to far off .
Happy felting and experimenting !
Wednesday, August 29, 2012
Alpaca,Llama,Mohair amd wool needle felt animals
The above critters are a blend of fibers with wool needle felted sculpture an added thick layer of alpaca, llama and mohair felted into base and then reverse felted . It takes almost as long to do the reverse felting as it does to shape the base sculpture , about 50-60 hours total for each animal . Below is the guy I worked on all last week and I did add the leather lids with mohair lashes but I still need to find a better way to do them . The hardest part is getting the lashes to curl up . I ended up using hairspray but that leaves them spikier then I would like .
One of the things I have always wanted to mention about working with animal fibers is that it actually has "memory" . You can see on the new animal below that one ear is open and one is curled . Although they are not wired, you can actually do some basic repositioning and they will stay that way until you reposition them .
Below, I am holding the arm up and when I let go, you can see that it retains some of that movement and then you can simply return it to original position . Although the animals are very firmly felted, they still have some natural movement if you want to move their arms, head or legs . I just think that is pretty cool .
Now I just need to get a green screen so I can do some stop motion movies with them . (That will never happen because I am so tech stupid but maybe someone else will try it ?)
Happy felting .
One of the things I have always wanted to mention about working with animal fibers is that it actually has "memory" . You can see on the new animal below that one ear is open and one is curled . Although they are not wired, you can actually do some basic repositioning and they will stay that way until you reposition them .
Below, I am holding the arm up and when I let go, you can see that it retains some of that movement and then you can simply return it to original position . Although the animals are very firmly felted, they still have some natural movement if you want to move their arms, head or legs . I just think that is pretty cool .
Now I just need to get a green screen so I can do some stop motion movies with them . (That will never happen because I am so tech stupid but maybe someone else will try it ?)
Happy felting .
Sunday, August 26, 2012
Adding eyelid,lashes and whisker details to needle felt animals
Above and below are two of my latest needle felt animals . The one on the left is my usual style and critter on right is with leather lids and lashes and a little shading on the "skin" . This is very much the experimental stage and still needs a lot of tweaking but these are some ideas that I have been wanting to try for a long time so thought I would share for you to take it in your own direction . Unfortunately, my usual low lighting is still a problem but if you click on the pictures you can see a little better detail .
Below are some of the items I collected to start this experiment . What you will need...
leather scrapes from recycled coats I bought and cut up from the thrift store .
Two sided tape from AXMAN both wide and narrow styles .
fingernail polish bought specifically to match pink skin tones
acrylic eyes
scissors or box cutter for cutting leather
brown/black mohair or alpaca for the lashes
A large or heavy book to hold leather strip
eyelash curler
hairspray or diluted clear drying glue( to shape lashes upwards)
The first step was adding the two sided tape onto side of leather you don't want showing .
Then cut along the edges of the tape for a nice straight line .
if you are using a thin leather, you can forget adding the pink nail polish to the edge and cut out larger then eye and wrap around back of eye . If you are using a thicker leather........
You can place the leather in pages of book as a clamp and with leather edge exposed add nail polish . just remember that it can drip and you don't want any of that on the front of lid so lean book in opposite direction . When it appears dry enough to not drip you can lay book down until it is completely dry <----(I learned the hard way that this is important )
Next step is the lashes and this picture shows what not to do ! I cut a strip of the thin two-sided tape and added directly to the eye above where I wanted the base of lid . I then peeled off the paper and added some of the brown mohair leaving about 1/2 of tape to fold over and hold lashes in place and that sort of worked but....as soon as I tried to trim and shape with lash curler , several of the lashes pulled out and I ended up with a bit of a mess .
Sorry no pictures of the solution but I basically took a larger then needed strip of the two-sided tape and taped the ends of it down leaving stick side up and placed a thinner layer of lashes on it . I then folded the sticky side on top of that (folding it in half ). That did work but next time I am going to try a thin layer of glue instead of folding tape over . you then cut to size and place above the line that will place the edge of the leather lid to cover the tape .
The second two experiments were......
shading using mineral make-up (instead of traditional paint in airbrush ). I did try using permanent markers for shading when I first started felting but I didn't like the crunchy rough texture that resulted . I thought some of my " never used" make up might make a more subtle result with out altering texture of the wool .
second experiment was how to add whiskers "if" I ever decide to....so far I like my animals better without them but I thought I might want to try it on some critters, some day . I bought some horse main? on Etsy and a beading needle that has a "hole" the length on the needle so is easy to thread .The needle is strnge enough to go through the wool but thin enough not to leave a big hole . Only problem I see is someone pulling on one end of the whisker could pull it all the way threw but hey.....Don't pull on the whiskers and problem solved . ( Although my goal is to make the most durable animals possible I don't think it is to much to ask that someone treat them as they would a living animal.....ie....don't throw them around the room, don't lift them by their arms or ears or pull on their tails or whiskers . )
That's it for now, more experiments to follow and hopefully, better pictures of my latest critters .
Below are some of the items I collected to start this experiment . What you will need...
leather scrapes from recycled coats I bought and cut up from the thrift store .
Two sided tape from AXMAN both wide and narrow styles .
fingernail polish bought specifically to match pink skin tones
acrylic eyes
scissors or box cutter for cutting leather
brown/black mohair or alpaca for the lashes
A large or heavy book to hold leather strip
eyelash curler
hairspray or diluted clear drying glue( to shape lashes upwards)
The first step was adding the two sided tape onto side of leather you don't want showing .
Then cut along the edges of the tape for a nice straight line .
if you are using a thin leather, you can forget adding the pink nail polish to the edge and cut out larger then eye and wrap around back of eye . If you are using a thicker leather........
You can place the leather in pages of book as a clamp and with leather edge exposed add nail polish . just remember that it can drip and you don't want any of that on the front of lid so lean book in opposite direction . When it appears dry enough to not drip you can lay book down until it is completely dry <----(I learned the hard way that this is important )
Next step is the lashes and this picture shows what not to do ! I cut a strip of the thin two-sided tape and added directly to the eye above where I wanted the base of lid . I then peeled off the paper and added some of the brown mohair leaving about 1/2 of tape to fold over and hold lashes in place and that sort of worked but....as soon as I tried to trim and shape with lash curler , several of the lashes pulled out and I ended up with a bit of a mess .
Sorry no pictures of the solution but I basically took a larger then needed strip of the two-sided tape and taped the ends of it down leaving stick side up and placed a thinner layer of lashes on it . I then folded the sticky side on top of that (folding it in half ). That did work but next time I am going to try a thin layer of glue instead of folding tape over . you then cut to size and place above the line that will place the edge of the leather lid to cover the tape .
The second two experiments were......
shading using mineral make-up (instead of traditional paint in airbrush ). I did try using permanent markers for shading when I first started felting but I didn't like the crunchy rough texture that resulted . I thought some of my " never used" make up might make a more subtle result with out altering texture of the wool .
second experiment was how to add whiskers "if" I ever decide to....so far I like my animals better without them but I thought I might want to try it on some critters, some day . I bought some horse main? on Etsy and a beading needle that has a "hole" the length on the needle so is easy to thread .The needle is strnge enough to go through the wool but thin enough not to leave a big hole . Only problem I see is someone pulling on one end of the whisker could pull it all the way threw but hey.....Don't pull on the whiskers and problem solved . ( Although my goal is to make the most durable animals possible I don't think it is to much to ask that someone treat them as they would a living animal.....ie....don't throw them around the room, don't lift them by their arms or ears or pull on their tails or whiskers . )
That's it for now, more experiments to follow and hopefully, better pictures of my latest critters .
Sunday, August 5, 2012
Pictorial for adding eyes and ears to needle felt animals
When I first began learning needle felt, figuring out how to add eyes and ears to my base sculpture was one of the biggest challenges . I tried several different methods before I came up with something that worked for me . It's obviously not the only way to get the job done and I do plan on playing around with fake furs and leather lids some day .
The first step is choosing what eye to add and for my extra large critters and low budget, I chose to use a nice quality/plastic safety eyes ...(if you click on the picture you will be able to read the label on the bag of the seller I use .) A pair of eyes is around a dollar compared to the $10 glass eyes cost . Also, instead of sewing eyes on, I cut off the back nub of the safety eyes using a wire cutter and glue them down with small drops of super glue . The lid will also help them stay in place just be very careful with the glue as it will ruin any wool it drips on .
Once the yes are glued down you can start on the top and bottom lids . I'm working with mohair here so when I pull of a section, the longer fibers are more then I need just to cover the eye but once the lid part is felted around eye any extra wool can be felted directly into the check bone area to make it blend in . I don't firm up the whole section , just about twice the area of the eye,(since it will shrink up as it is completely firmed up over the eye .
I then attach the simi-firmed lid into place at the corner of the eye area and continue firming the lid "before" attaching the outer edge . The most important things to remember is to be careful not to poke the eye itself and to felt very small sections at a time . Due to shrinkage, you can't just tack the whole lid down at once but work from inner lid to outer .
You follow the above step for all four lids and blend the extra wool into the face after the lids are firmly where you want them . Because I am generally not going for a "real" animal eye look, I have the freedom to use some creativity to make the eyes "pop" . I add Vanilla merino which has a light pink tone that I like for my "flesh" color, snout, nose , ears and around eyes . I know not all animals have pink skin tones but I found the darker colors just don't have enough contrast with the brown fibers I use . I do plan on using some detail coloring to add some more natural depth to the "flesh" area but that will have to be a different tutorial . After the pink is felted into the eye lid, I use small balls of white at the eye corners to fill in the rest of the area .
I tend to use large floppy ears on most of my animals but went with a shorter ear for this guy . Again. I am using a long fiber mohair for this and just pull out one section and fold it in half . Because the fibers are all going the same direction which makes for slow felting, I add a very thin layer going side ways . Think of it as similar to creating fabric which couldn't be woven unless fiber/threads are laid across each other, not all laying parallel .Felt area and flip and repeat this at least 4 times to create a semi felted sheet . focus on edges to shape and firm the shape you want and add small bits of fiber if it's not the shape you want .
For longer floppy ears just don't fold in half and don't forget to add the cross fibers . The main rule of felting is don't forget that everything will shrink , A general rule is you will lose 1/2 to 1/3 the size you start with once the piece is felted and this is especially true for thin areas like lids and ears .
Some times I use roving for the inner ear but I recommend creating another semi felted pink piece rather then just adding pink roving directly to the semi felted brown ear . Above is a newer method felting premade semi-felt directly to the home made prefelted ear . I actually felt the pink semi-felt into the ear starting at the center of ear and felting out and then cut around the attached inner and out ear .The ears are still in a prefelt state here, so a bit strange looking but I like to add them to the head at this stage and firm and shape them more after attaching . It's easier to felt to head if you create a semi-circle by felting the bottom edges together and felt into head "trying" to attach them in symmetrical placement-------I'm embarrassed to admit that mine are never symetrical . Some glitch in my brain causes one ear to always be a little higher or further back on the head , (God made the same mistake with my own ears so I guess I shouldn't feel in to bad ). Hopefully you can get them centered where you want them : ) One thing I like about this method is that it naturally creates those little fleshy bits on the inside of the ear . Just make sure that you start attaching by felting down the bottom of the inner ear where you want the ear , folding the bumpy bits in and felting down the back of the ear . Actually was much easier to type then it is to do but just take your time and keep checking your placement .
Once the ears are attached where I sort of want them, I firm and shape them as evenly as possible . If one ear ends up larger then the other just make sure and call it "whimsical" and all is forgiven : )
You can leave it at this point but I am in love with my reverse felting needles and reverse felt the head starting at the base and working up to the top . You can also just reverse felt sections for a totally different look or trim "fur" to different lengths . I generally just trim the top of the nose and comb the rest to style it .One of the funnest thing about reverse felting is creating different layers of contrasting color and types of fiber . When the reverse needles pull out the fibers you can get some really interesting textures and color blends .
Happy felting !
The first step is choosing what eye to add and for my extra large critters and low budget, I chose to use a nice quality/plastic safety eyes ...(if you click on the picture you will be able to read the label on the bag of the seller I use .) A pair of eyes is around a dollar compared to the $10 glass eyes cost . Also, instead of sewing eyes on, I cut off the back nub of the safety eyes using a wire cutter and glue them down with small drops of super glue . The lid will also help them stay in place just be very careful with the glue as it will ruin any wool it drips on .
Once the yes are glued down you can start on the top and bottom lids . I'm working with mohair here so when I pull of a section, the longer fibers are more then I need just to cover the eye but once the lid part is felted around eye any extra wool can be felted directly into the check bone area to make it blend in . I don't firm up the whole section , just about twice the area of the eye,(since it will shrink up as it is completely firmed up over the eye .
I then attach the simi-firmed lid into place at the corner of the eye area and continue firming the lid "before" attaching the outer edge . The most important things to remember is to be careful not to poke the eye itself and to felt very small sections at a time . Due to shrinkage, you can't just tack the whole lid down at once but work from inner lid to outer .
You follow the above step for all four lids and blend the extra wool into the face after the lids are firmly where you want them . Because I am generally not going for a "real" animal eye look, I have the freedom to use some creativity to make the eyes "pop" . I add Vanilla merino which has a light pink tone that I like for my "flesh" color, snout, nose , ears and around eyes . I know not all animals have pink skin tones but I found the darker colors just don't have enough contrast with the brown fibers I use . I do plan on using some detail coloring to add some more natural depth to the "flesh" area but that will have to be a different tutorial . After the pink is felted into the eye lid, I use small balls of white at the eye corners to fill in the rest of the area .
I tend to use large floppy ears on most of my animals but went with a shorter ear for this guy . Again. I am using a long fiber mohair for this and just pull out one section and fold it in half . Because the fibers are all going the same direction which makes for slow felting, I add a very thin layer going side ways . Think of it as similar to creating fabric which couldn't be woven unless fiber/threads are laid across each other, not all laying parallel .Felt area and flip and repeat this at least 4 times to create a semi felted sheet . focus on edges to shape and firm the shape you want and add small bits of fiber if it's not the shape you want .
For longer floppy ears just don't fold in half and don't forget to add the cross fibers . The main rule of felting is don't forget that everything will shrink , A general rule is you will lose 1/2 to 1/3 the size you start with once the piece is felted and this is especially true for thin areas like lids and ears .
Some times I use roving for the inner ear but I recommend creating another semi felted pink piece rather then just adding pink roving directly to the semi felted brown ear . Above is a newer method felting premade semi-felt directly to the home made prefelted ear . I actually felt the pink semi-felt into the ear starting at the center of ear and felting out and then cut around the attached inner and out ear .The ears are still in a prefelt state here, so a bit strange looking but I like to add them to the head at this stage and firm and shape them more after attaching . It's easier to felt to head if you create a semi-circle by felting the bottom edges together and felt into head "trying" to attach them in symmetrical placement-------I'm embarrassed to admit that mine are never symetrical . Some glitch in my brain causes one ear to always be a little higher or further back on the head , (God made the same mistake with my own ears so I guess I shouldn't feel in to bad ). Hopefully you can get them centered where you want them : ) One thing I like about this method is that it naturally creates those little fleshy bits on the inside of the ear . Just make sure that you start attaching by felting down the bottom of the inner ear where you want the ear , folding the bumpy bits in and felting down the back of the ear . Actually was much easier to type then it is to do but just take your time and keep checking your placement .
Once the ears are attached where I sort of want them, I firm and shape them as evenly as possible . If one ear ends up larger then the other just make sure and call it "whimsical" and all is forgiven : )
You can leave it at this point but I am in love with my reverse felting needles and reverse felt the head starting at the base and working up to the top . You can also just reverse felt sections for a totally different look or trim "fur" to different lengths . I generally just trim the top of the nose and comb the rest to style it .One of the funnest thing about reverse felting is creating different layers of contrasting color and types of fiber . When the reverse needles pull out the fibers you can get some really interesting textures and color blends .
Happy felting !
Subscribe to:
Posts (Atom)